NestSheet → MainTop PRESET IN THE BOX

Export from NestSheet to MainTop — the hand-off, pinned.

A MainTop preset ships in the box, and the export matrix’s default channel names — W1–W8 / V1–V4 — are labelled MainTOP-style in the shipped product. Below: which lane to take, what the preset pins, and the two failure modes it exists to prevent.

Facts checked — preset values quote the shipped file maintop-default.json; RIP claims carry vendor sources below.

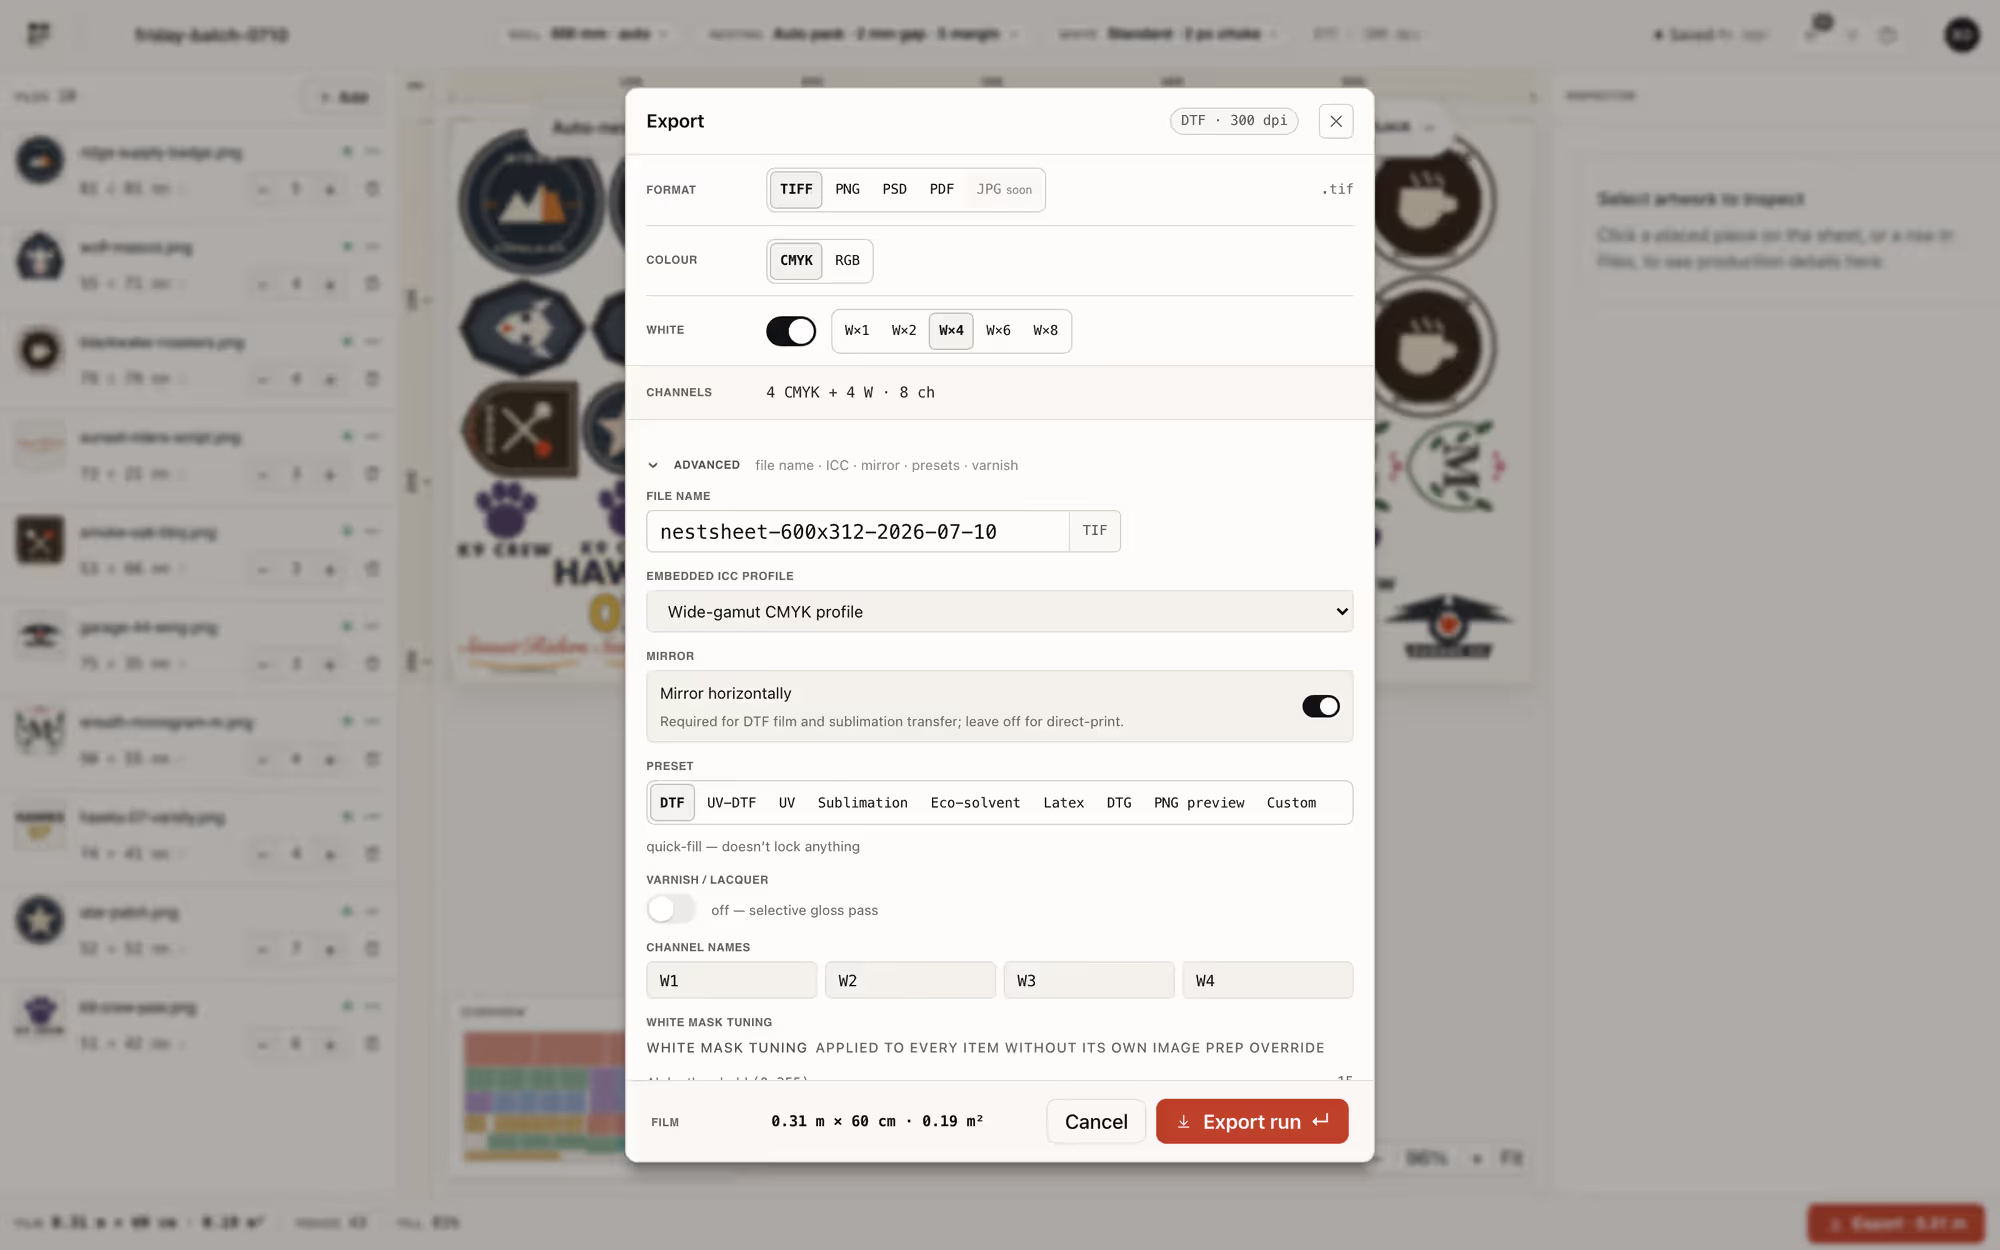
NestSheet export modal set up for a MainTop hand-off: format cells with TIFF, PNG, PSD and PDF, white and varnish channel counts, ICC selector and mirror toggle in the Advanced section
The export modal: format, channels, ICC and mirror — the whole hand-off in one panel.

The RIP

What MainTop is — and what it wants.

MainTop DTP is the RIP from Maintop Technology Development Co., Ltd. — the 6.x and 7.0 lines are the ones the vendor currently publishes on its official download page, manual included. NestSheet targets it by name: the boxed preset is tuned for it, and our default spot-channel labels carry its name — W1–W8 / V1–V4, marked MainTOP-style in the shipped export matrix.

There are two honest ways to hand MainTop a gang sheet: a flat PNG that carries no white at all — our boxed preset’s lane, which leaves the underbase to be built after hand-off — or a multi-channel TIFF where NestSheet has already built the white as named spot channels. The boxed preset covers the first lane; the export matrix covers both.

How-to

The hand-off, step by step.

Five steps from nested sheet to the file we hand MainTop — every value pinned on our side.

  1. Nest on the roll you actually run

    Auto-nest is on by default: pick your roll width (presets from 300 to 1800 mm, custom sheets up to 2000 × 10000 mm), keep the 2 mm gap and 5 mm margin unless your slitter says otherwise, and let the packer fill the sheet.

  2. Pick the lane: PNG (our preset leaves white to the RIP) or TIFF CMYK + white (we build it)

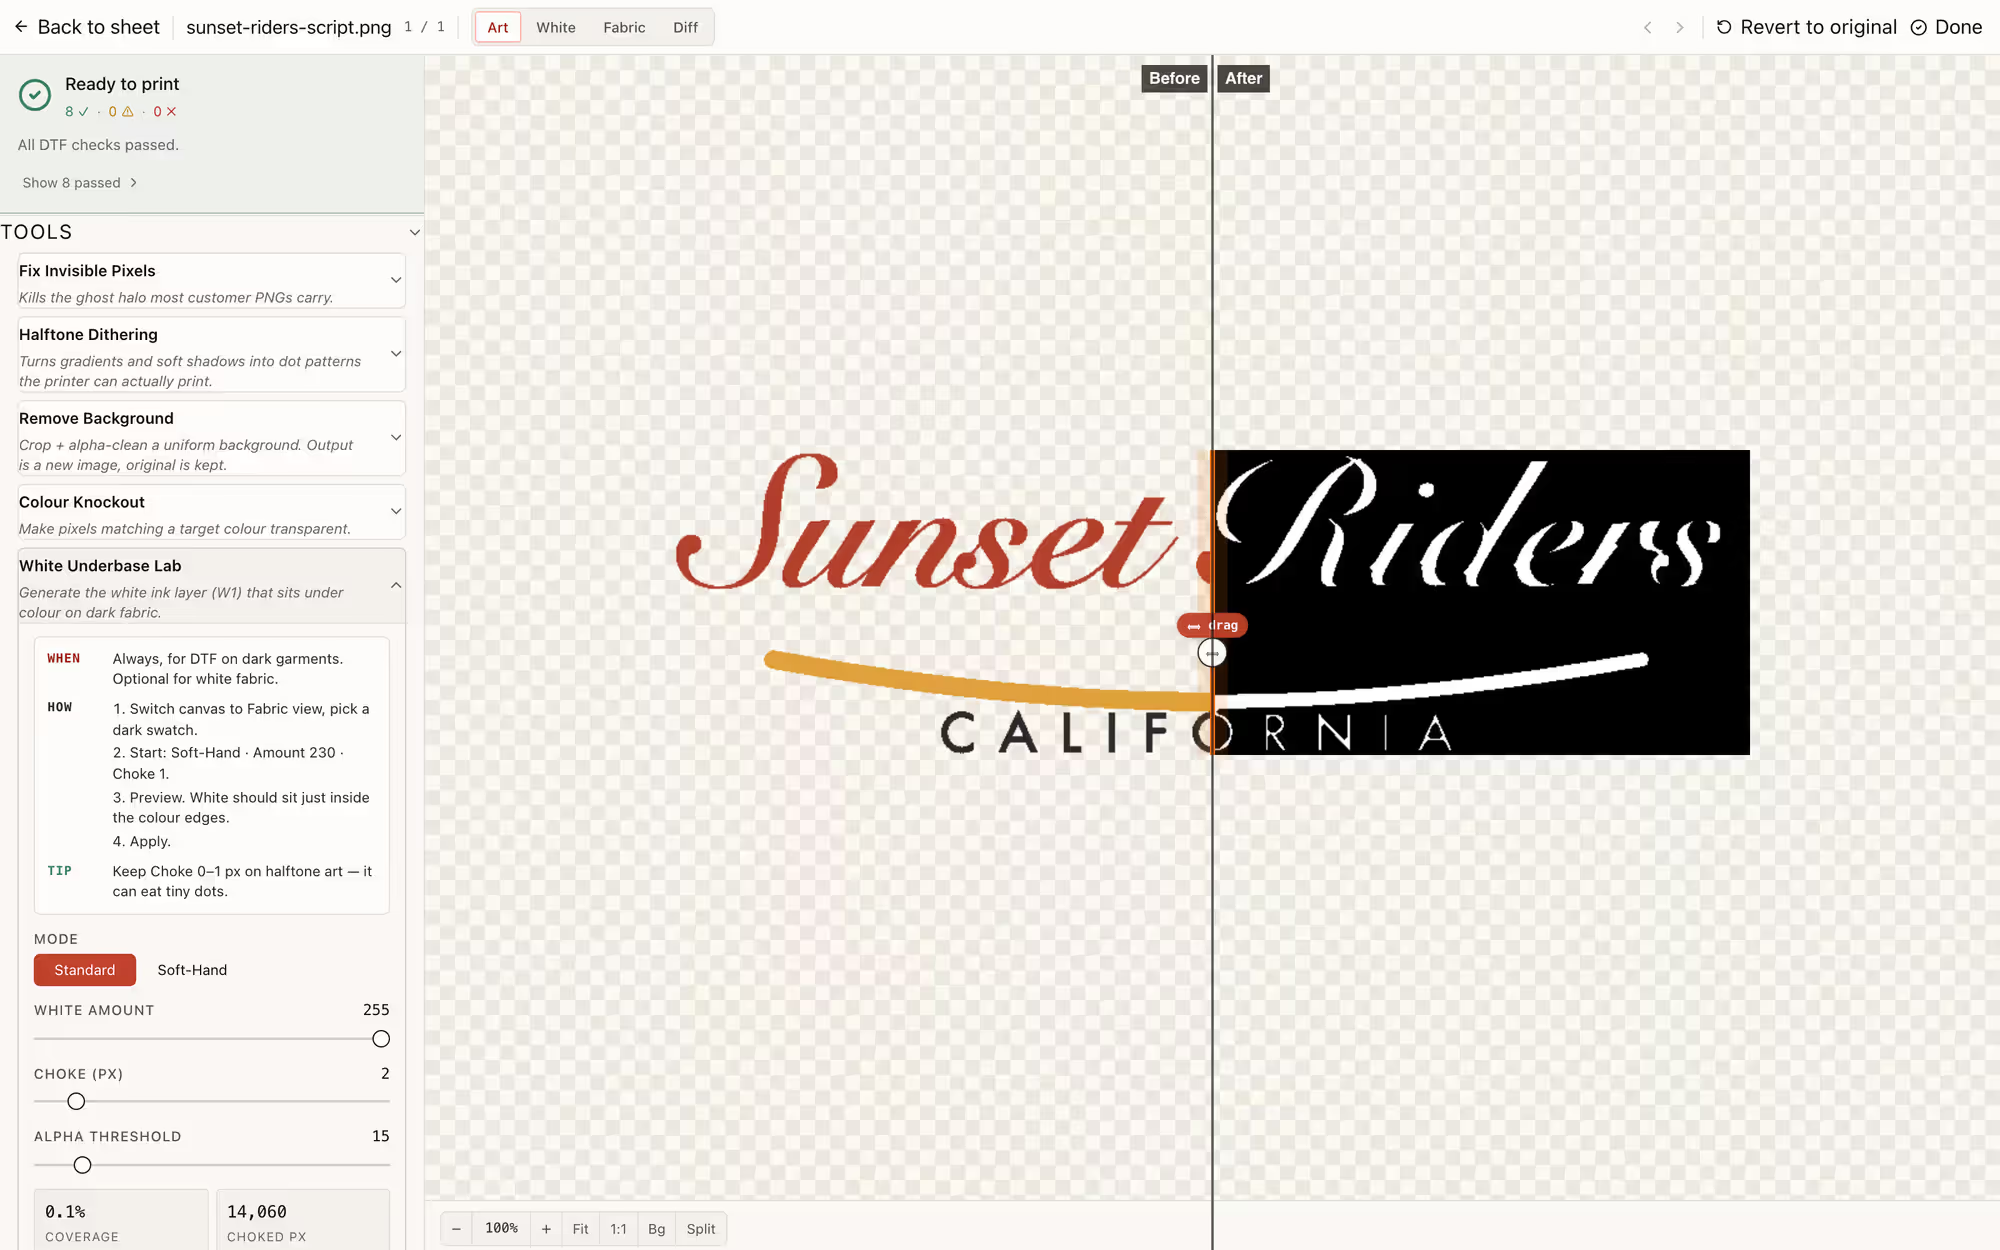
    The PNG lane matches the boxed preset: an 8-bit sRGB PNG with clean alpha and no white in it — the preset leaves the underbase to whatever builds it after hand-off, and its binary-alpha snap exists so that build starts from an unambiguous edge. The TIFF lane is TIFF · CMYK + White in the export modal: 4, 6 or 8 white channels rendered by NestSheet with choke you previewed (0–10 px, default 2 px ≈ 0.17 mm at 300 dpi), Epson wide-gamut CMYK as the pinned intent.

    White Underbase Lab in the Prep terminal: white amount, choke and alpha threshold sliders with a live split preview of the generated white channel — the TIFF lane where NestSheet builds the white before MainTop sees the file
    The TIFF lane: white built and previewed here, named W1–W8 for MainTop.
  3. Name the channels — or keep the W1–W8 / V1–V4 default

    White and varnish channels default to W1–W8 / V1–V4 — the scheme the shipped export matrix labels MainTOP-style. If your rig expects something else, Advanced → Channel names takes free-text renames per export (up to 8 white names, 32 characters each). Nothing to configure twice: the names are written into the file.

  4. Prove orientation with the exact export path

    The boxed preset declares Mirror on, but a declared default does not prove the orientation emitted by every export path. Export an asymmetric target with readable text through the exact row you will use, import it into the exact MainTop version and queue, and inspect the RIP preview before committing film. Assign the flip to one stage only after that controlled test; do not infer CMYK + White TIFF orientation from the row default.

  5. Import in MainTop and check the white before you print

    Open the file in MainTop and check the white against the artwork edge before committing film — a preview if your build offers one, a test strip if not. If the white looks wrong at this stage, it is cheaper than on film — here is what to look for.

The preset

What the boxed preset pins.

Every value read from server/assets/rip-profiles/maintop-default.json — the file the product loads.

Shipped values of maintop-default.json
Field Shipped value
Preset file maintop-default.json
Preset name MainTOP DTP V6/V7
Format PNG
Alpha binary snap at threshold 128
Colour space sRGB
Mirror on (film transfer)
Resolution 300 dpi
All-white fix gutter dot · #FF0000 · 3 px · opacity 1.0
File naming {order}_{design}_{w}x{h}mm.png
Max sheet length none pinned by the preset

Failure modes

Typical failure modes — and what prevents them.

Each of these is a real way a MainTop hand-off goes wrong; the fix column is what the preset or the workflow does about it.

Patchy white on soft edges

SymptomGlows, drop shadows and anti-aliased edges come out as uneven white ink density on film.

PreventionThis is the case the preset exists for — its own notes read “Binary alpha mandatory — semi-transparent pixels create uneven white ink density”. The snap at threshold 128 happens before the file leaves NestSheet, so every pixel is fully in or fully out. If you need soft edges printed, take the TIFF lane and let NestSheet build the white with a halftone mode instead.

All-white artwork prints nothing

SymptomA design that is pure white on transparency — a white logo, white text — is the easiest job to lose: with no colour anywhere in the file, nothing visibly distinguishes it from an empty sheet.

PreventionThe preset’s all-white fix is on: when an export contains no non-white pixel, our exporter places a 3 px red dot in the gutter (outside the trim), so the file that reaches MainTop is never technically empty; your white artwork rides along and the dot cuts off with the margin.

One file carrying a whole day of orders

SymptomThe temptation is to export a day’s work as a single multi-metre sheet — one enormous raster, one point of failure.

PreventionNestSheet caps every export at 300 000 px per dimension and custom sheets at 10 m — a hard bound on how much we let one file carry. Split monster orders across sheets; sheets are cheap, redoing a day is not.

Colour arrives double-managed

SymptomPrints come out flat or shifted because the file was colour-converted twice on its way to ink.

PreventionSend what the lane expects: on the PNG lane NestSheet does no ink conversion — the file ships as plain sRGB and colour stays on your side of the hand-off; the TIFF lane embeds the Epson wide-gamut CMYK profile NestSheet rendered to. Pick one owner of colour, not two.

FAQ

The questions operators actually search.

RGB or CMYK for DTF?
Both are legitimate — the split is who converts. On the PNG lane NestSheet ships plain sRGB and does no ink conversion at all — that stage lives on your side of the hand-off; on the TIFF CMYK + White lane NestSheet renders CMYK against the pinned Epson wide-gamut intent and builds the white channels too. What breaks prints is not the letters, it is converting twice.
What choke setting should I use?
Choke applies when NestSheet builds the white — the TIFF lane. The default is 2 px (≈ 0.17 mm at 300 dpi), adjustable 0–10 px with a live preview. On the PNG lane NestSheet builds no white at all, so choke belongs wherever your underbase is actually made — never in both places.
Why do prints look faded on dark shirts?
Almost always an underbase problem, not a colour problem: too little white behind the ink. On the TIFF lane raise the white amount (0–255) in NestSheet and check the white preview; on the PNG lane our file carries no underbase, so tune the white wherever yours is built. The fade is the shirt showing through.

Sources

Where the RIP facts come from.

What each vendor states — versions, downloads, headline features — we cite from the vendor’s own pages, checked on the date above; the prep and hand-off rules are NestSheet’s own, read from the shipped preset file.

Keep going

Related on this site.

Nest a sheet and export for MainTop — free.

The MainTop preset and the W1–W8 naming are on every plan, including Free. No card, no timer — drop files, nest, export.

PNG · binary alpha · mirrored W1–W8 — MainTop-style default Free forever · no card